Layout User Interface - LUI
LUI helps to create Buttons, Menus and Healthbars on the screen. Other than the normal Graphics Engine it's tightly bound to a layout system that helps to deal with different screen sizes.
Internally it makes use of the same render instance which means it can use the same Texture objects and SpriteSheet as the normal game. This helps to reduce draw calls even if a game mixes world-graphics objects with UI graphics objects.
LUI is implemented as a classic object orientated set of classes. This is good for developing the UI itself but feels a bit aged when designing UIs. To make things faster there is a swiss-army-object called: $ui(...). It's a utility that helps to creating LUI objects. The code examples in here will show both approaches.
HTML UIs
If you're already an expert in creating UIs with things like Vue or React and learning a new UI isn't your thing: it's a viable option to layer an HTML UI ontop of the game canvas.
It might break your framerate at times, and you have to write some glue code, but it's doable.
Create a LUIManager
For starters it's best to use the @GraphicsEngine:typesprite:
# myworld.edf

[!Core]
@GraphicsEngine:typesprite

[!MyUI->Core]
@MyUI
It not just brings the normal game graphics engine but also provides a working LUI environment.
Created as a static component you can access it via @link in your Component(s):
import {GraphicsEngine, Component} from 'typesprite'

export class MyUI extends Component {

    @link('GraphicsEngine:typesprite')
    private gfx:GraphicsEngine

    onInit() {
        this.gfx.gui;       // < LUILayer, predefined, infront of the game world
        this.gfx.guiBehind; // < LUILayer, predefined, behind the game world
        this.gfx.lui;       // < LUIManager, access to the root object
    }
}
Custom LUIManager
Technically it's easy to create your own LUIManager and do things in a more custom way. It basically means that you have to write your own version of GraphicsEngine. Again, that's also not a big thing.
However, explaining all the details here in an approachable fashion would be an overkill. To dive deep into the inner workings of LUIManager, FatRenderer, canvas management etc. check out the implementation of GraphicsEngine.ts GitHub.
LUIElement - the new <DIV>
To create a UI with LUI you put together a tree of LUIElement instances. Like in so many other examples you have a root element, attach children to it and each child can have their own children.
- LUIElement: "gui"
  - LUIElement: "el1"
  - LUIElement: "el2"
    - LUIElement: "el3"
- LUIElement: "el4"import {$ui} from 'typesprite'
// In a component like MyUI.ts
$ui(this.gfx.gui)
.newChild
.setName("el1")
.endChild
.newChild
.setName("el2")
.newChild
.setName("el3")
.endChild
.endChild
.newChild
.setName("el4")
.endChild
;import {LUIElement} from 'typesprite'
// In a component like MyUI.ts
const el1 = new LUIElement().setName("el1");
const el2 = new LUIElement().setName("el2");
const el3 = new LUIElement().setName("el3");
const el4 = new LUIElement().setName("el4");
this.gfx.gui.addChild(el1)
this.gfx.gui.addChild(el2)
el2.addChild(el3)
this.gfx.gui.addChild(el4)Layout Basics
A LUI instance is attached to a canvas and each LUILayer always has the size of the entire canvas (full height, full width).
When adding children to a parent element the parent is responsible for the layout of all it's direct children. Everytime the UI gets layouted each parent sets the size of the children.
To control this each LUIElement is equipped with a setContainerLayout() function. By providing a container layout object we change the way how the children of the objects get placed. To be able to adjust the layout behavior of the children we can also set layout properties which can be used by the container layout.
For example if we like to el1 to consume full width and 30px height of the canvas we would do this:
// In a component like MyUI.ts

const layer1 = $ui(this.gfx.gui)
    .newChild.setName('layer1')
        .childrenLayoutSpace
        .newChild.setName('el1')
            .layoutProp(LUISpaceLayout.PropDir, LUISpaceLayout.DirTop)
            .layoutProp(LUISpaceLayout.PropSize, 30)
        .endChild
    .endChild
;// In a component like MyUI.ts
// define the layout behavior
const layer1 = new LUIElement().setName("layer1");
this.gfx.gui.addChild(layer1);
layer1.setContainerLayout(new LUISpaceLayout())
// let el1 consume 30 pixel of top space
const el1 = new LUIElement().setName('el1');
el1.setLayoutProperty(LUISpaceLayout.PropDir, LUISpaceLayout.DirTop);
el1.setLayoutProperty(LUISpaceLayout.PropSize, 30);Padding
Each LUIElement has a padding property. This reduces the size of the object itself.
el1.getPadding().setTop(10); // 10 pixel top paddingThe input and rendering objects allow reacting on padding space or not.
Styles & Rendering
LUIElements do not draw a thing. Similar to DIVs they just occupy a rectangle area of screenspace that follows layout rules. To make them draw something one has to create and set LUIStyle objects.
A LUIStyle object is composed of LUIStyleElements. Those elements actually perform the drawing. One LUIStyles instance can be attached to multiple LUIElements. So bascially the idea is to design various style objects and attach them to the LUIElements.
const style = $ui.style.fill("#f00").done;

// apply to elements
el1.setStyle(style); // el1 will be red now
el2.setStyle(style); // el2 is also redconst style = new LUIStyle();
const fill = new LUIFill();
fill.color.parseFromString("#f00");
style.addChild(fill);
// apply to elements
el1.setStyle(style); // el1 will be red now
el2.setStyle(style); // el2 is also redIn cases were we do not need or want to share the style object we can shorten the code above like this:
$ui(el1).styleFill("#f00");const fill = new LUIFill();
fill.color.parseFromString("#f00");
el1.addStyleElement(fill); // modifies or creates a style object within el1The base class LUILayoutElement brings an option to only consume the padding space. Setting fill.onPaddingSpace = true would mean that the fill will also be rendered on padding space.
Layouts
All Layout classes are subclasses of LUIContainerLayouter. You can do your own or use one of TypeSprites standard implementations:
| Class | $ui name | Characteristics |
|---|---|---|
LUIFreeStackLayout | .childrenLayoutFreeStack (default if no other ContainerLayout exists) | Children are stacked in the order attached to parent. Per default a child consumes full space of parent. Can be freely adjusted with properties like top, left etc. |
LUISpaceLayout | .childrenLayoutSpace | Each child consumes a space of the parent area. |
LUILineLayout .createXAligned | .childrenLayoutXAligned | Children are placed on X-Axis from left to right |
LUILineLayout .createYAligned | .childrenLayoutYAligned | Children are placed on Y-Axis from top to bottom |
There is also LUIStackLayout which is a limited version of LUIFreeStackLayout.
LUIFreeStackLayout:
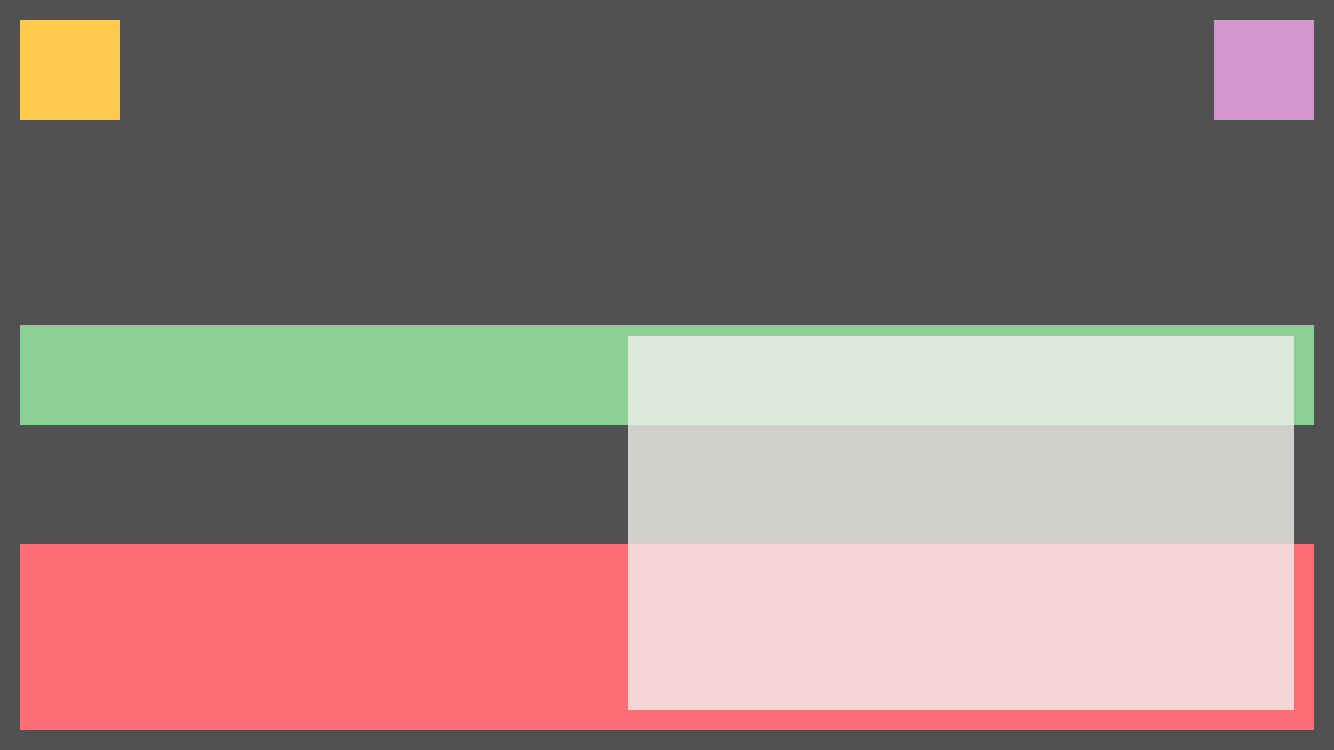
$ui(this.gfx.gui)
    .newChild
        .childrenLayoutFreeStack // (default)
        .styleFill("#515151")
        .newChild
            .styleFill("#ffcb4f") // Yellow (top, left)
            .layoutFreeStack({top: 10, left: 10, width: 50, height: 50})
        .endChild
        .newChild
            .styleFill("#d595cf") // Pink (top, right)
            .layoutFreeStack({top: 10, right: 10, width: 50, height: 50})
        .endChild
        .newChild
            .styleFill("#8acf94") // Green (middle)
            .layoutFreeStack({left: 10, right: 10, height: 50})
        .endChild
        .newChild
            .styleFill("#ff6e76") // Red (bottom)
            .layoutFreeStack({bottom: 10, left: 10, right: 10, height: 0.25})
        .endChild
        .newChild
            .styleFill("#f2f0ec", 0.8 /* alpha */) // Light Gray (overlaps)
            .layoutFreeStack({bottom: 20, right: 20, width: 0.5, height: 0.5})
        .endChild
    .endChild
;const panel = new LUIElement();
this.gfx.gui.addChild(panel);
panel.setContainerLayout(new LUIFreeStackLayout());
{
const style = new LUIStyleFill();
style.color.setFromHash("#515151")
panel.addStyleElement(style);
}
{
const child = new LUIElement();
const style = new LUIStyleFill();
style.color.setFromHash("#ffcb4f")
child.addStyleElement(style);
LUIFreeStackLayout.layout(child, {top: 10, left: 10, width: 50, height: 50})
panel.addChild(child);
}
{
const child = new LUIElement();
const style = new LUIStyleFill();
style.color.setFromHash("#d595cf")
child.addStyleElement(style);
LUIFreeStackLayout.layout(child, {top: 10, right: 10, width: 50, height: 50})
panel.addChild(child);
}
{
const child = new LUIElement();
const style = new LUIStyleFill();
style.color.setFromHash("#8acf94")
child.addStyleElement(style);
LUIFreeStackLayout.layout(child, {left: 10, right: 10, height: 50})
panel.addChild(child);
}
{
const child = new LUIElement();
const style = new LUIStyleFill();
style.color.setFromHash("#ff6e76") // 25%
child.addStyleElement(style); // v
LUIFreeStackLayout.layout(child, {bottom: 10, left: 10, right: 10, height: 0.25})
panel.addChild(child);
}
{
const child = new LUIElement();
const style = new LUIStyleFill();
style.color.setFromHash("#f2f0ec").setAlpha(0.8);
child.addStyleElement(style);
LUIFreeStackLayout.layout(child, {bottom: 20, right: 20, width: 0.5, height: 0.5})
panel.addChild(child);
}LUISpaceLayout
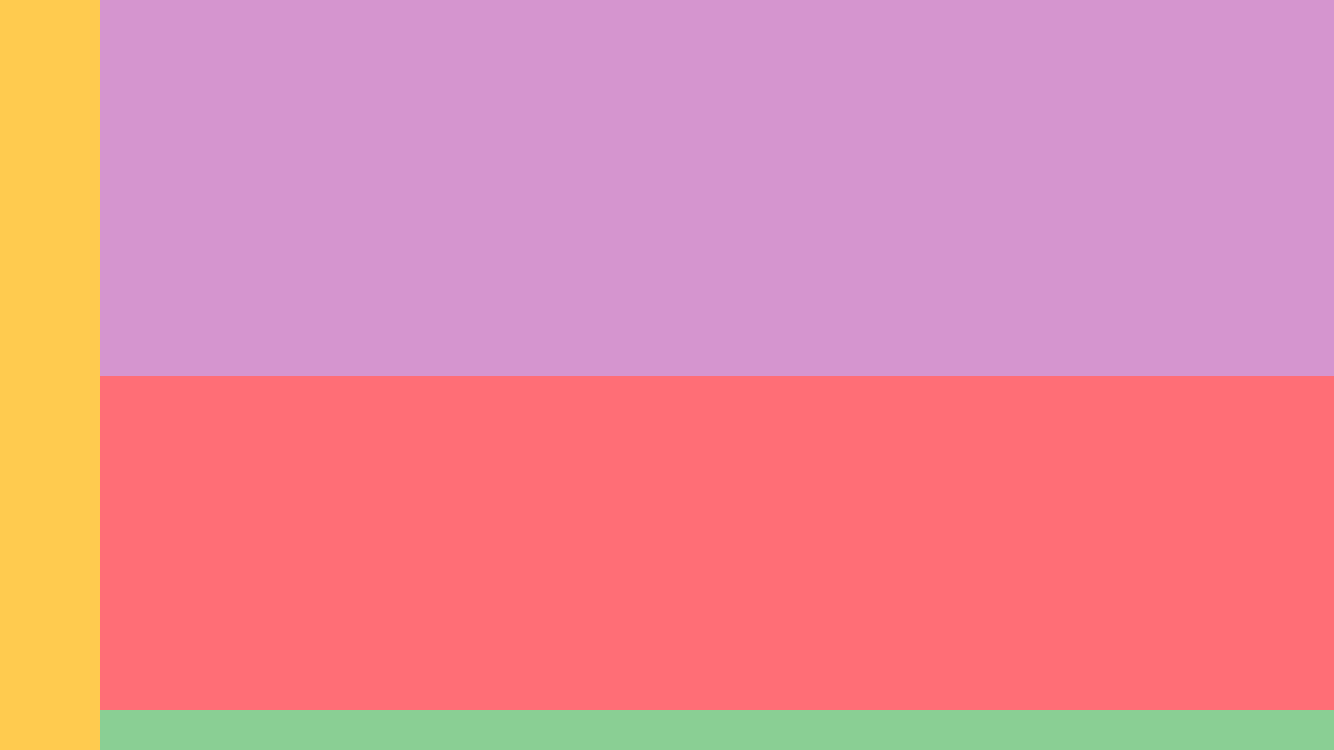
$ui(this.gfx.gui)
    .newChild
        .childrenLayoutSpace
        .styleFill("#515151")
        .newChild
            .styleFill("#ffcb4f") // Yellow left
            .layoutProp(LUISpaceLayout.PropDir, LUISpaceLayout.DirLeft)
            .layoutProp(LUISpaceLayout.PropSize, 50)
        .endChild
        .newChild
            .styleFill("#d595cf") // pink upper half
            .layoutProp(LUISpaceLayout.PropDir, LUISpaceLayout.DirTop)
            .layoutProp(LUISpaceLayout.PropSize, 0.5) // 50%
        .endChild
        .newChild
            .styleFill("#8acf94") // green bottom
            .layoutProp(LUISpaceLayout.PropDir, LUISpaceLayout.DirBottom)
            .layoutProp(LUISpaceLayout.PropSize, 20)
        .endChild
        .newChild
            .styleFill("#ff6e76") // center
            .layoutProp(LUISpaceLayout.PropRest, LUISpaceLayout.AxisX)
        .endChild

    .endChild
;const baseStyle = new LUIStyleFill();
baseStyle.color.setFromHash("#515151")
const base = new LUIElement().addStyleElement(baseStyle);
base.setContainerLayout(new LUISpaceLayout())
this.gfx.gui.addChild(base);
{
const elemStyle = new LUIStyleFill(); // yellow left
elemStyle.color.setFromHash("#ffcb4f")
const elem = new LUIElement();
elem.addStyleElement(elemStyle)
elem.setLayoutProperty(LUISpaceLayout.PropDir, LUISpaceLayout.DirLeft)
elem.setLayoutProperty(LUISpaceLayout.PropSize, 50)
base.addChild(elem);
}
{
const elemStyle = new LUIStyleFill(); // pink upper half
elemStyle.color.setFromHash("#d595cf")
const elem = new LUIElement();
elem.addStyleElement(elemStyle)
elem.setLayoutProperty(LUISpaceLayout.PropDir, LUISpaceLayout.DirTop)
elem.setLayoutProperty(LUISpaceLayout.PropSize, 0.5) // 50%
base.addChild(elem);
}
{
const elemStyle = new LUIStyleFill(); // green bottom
elemStyle.color.setFromHash("#8acf94")
const elem = new LUIElement();
elem.addStyleElement(elemStyle)
elem.setLayoutProperty(LUISpaceLayout.PropDir, LUISpaceLayout.DirBottom)
elem.setLayoutProperty(LUISpaceLayout.PropSize, 20)
base.addChild(elem);
}
{
const elemStyle = new LUIStyleFill(); // center
elemStyle.color.setFromHash("#ff6e76")
const elem = new LUIElement();
elem.addStyleElement(elemStyle)
elem.setLayoutProperty(LUISpaceLayout.PropRest, LUISpaceLayout.AxisX)
base.addChild(elem);
}LUILineLayout (childrenLayoutXAligned)
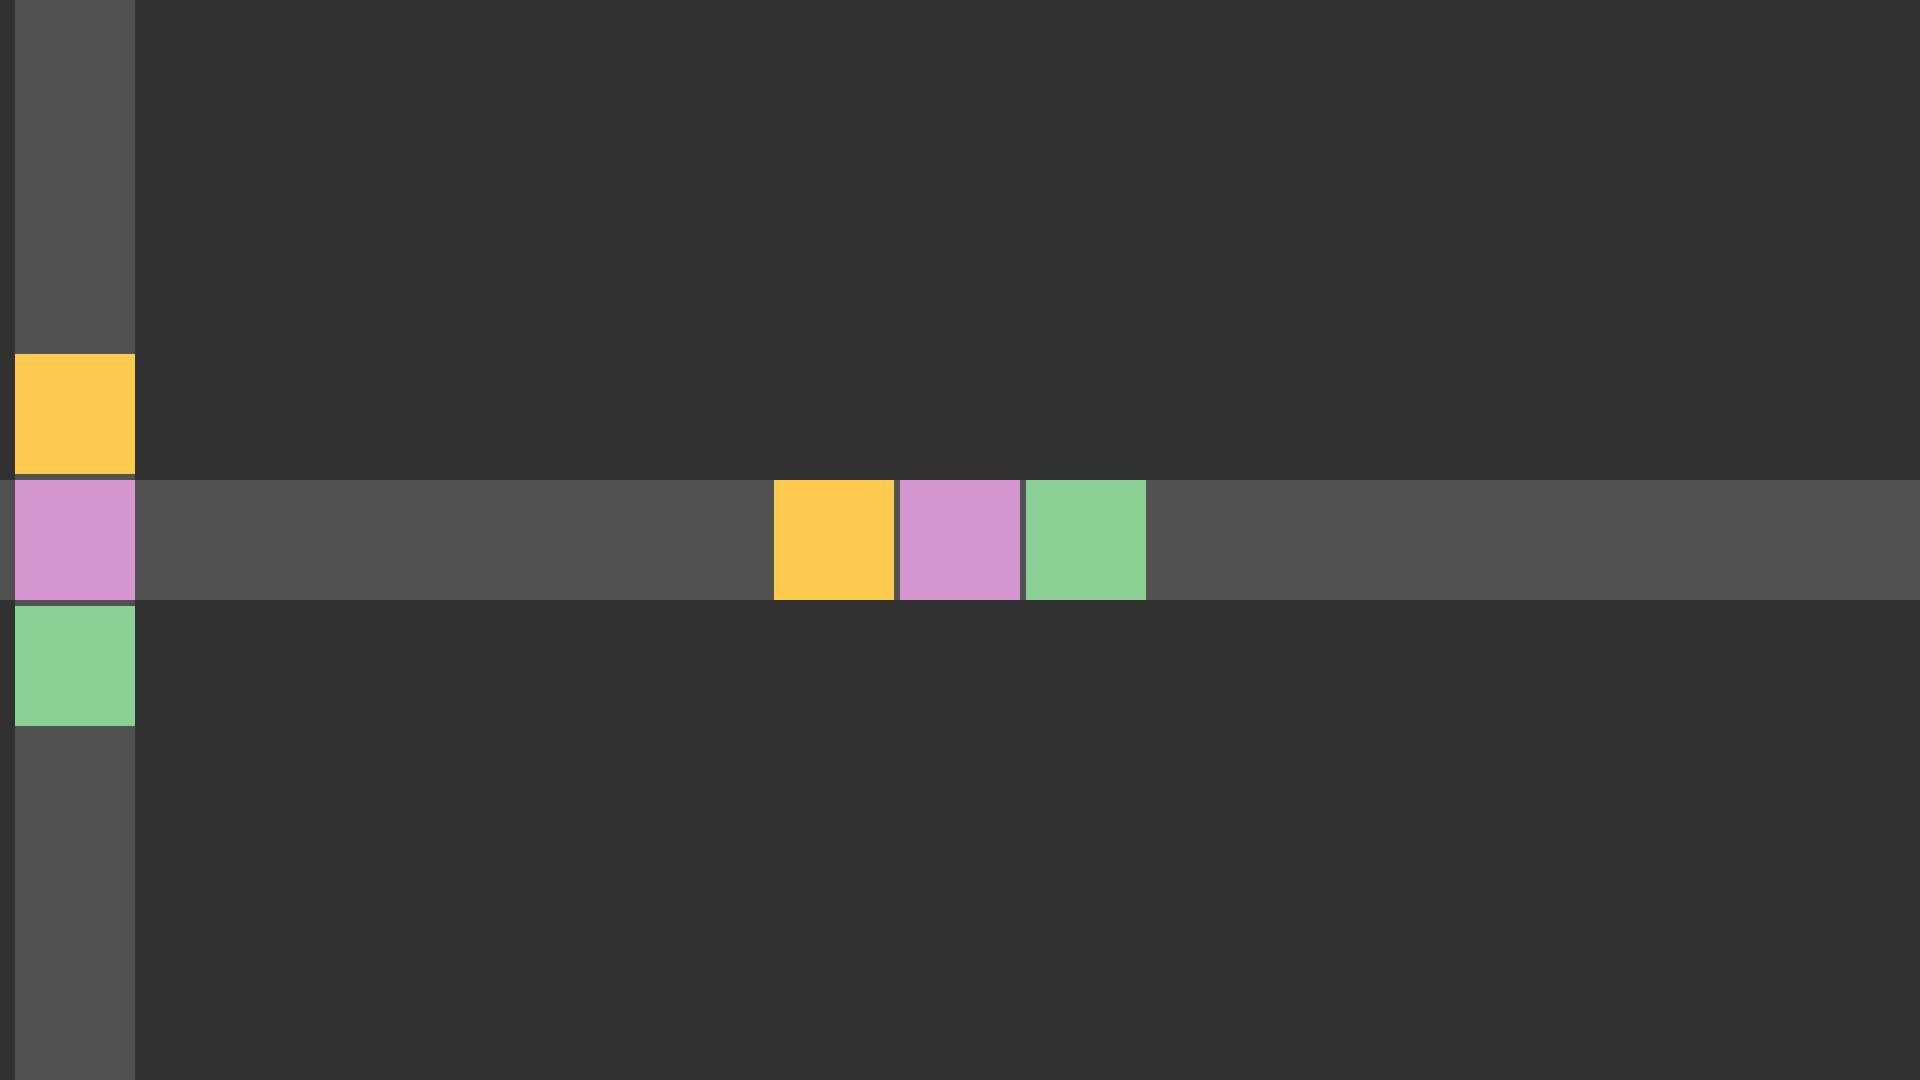
$ui(this.gfx.gui)
    .newChild
        .styleFill("#313131")
    .endChild
    .newChild
        .styleFill("#515151")
        .layoutFreeStack({height: 40})
        .childrenLayoutXAligned(40, 2)
        .newChild
            .styleFill("#ffcb4f")
        .endChild
        .newChild
            .styleFill("#d595cf")
        .endChild
        .newChild
            .styleFill("#8acf94")
        .endChild
    .endChild
    .newChild
        .styleFill("#515151")
        .layoutFreeStack({left: 5, width: 40})
        .childrenLayoutYAligned(40, 2)
        .newChild
            .styleFill("#ffcb4f")
        .endChild
        .newChild
            .styleFill("#d595cf")
        .endChild
        .newChild
            .styleFill("#8acf94")
        .endChild
    .endChild
;const bg = new LUIElement();
const bgStyle = new LUIStyleFill();
bgStyle.color.setFromHash("#313131")
bg.addStyleElement(bgStyle);
this.gfx.gui.addChild(bg)
//
// horizontal
const xLine = new LUIElement();
const xLineStyle = new LUIStyleFill();
xLineStyle.color.setFromHash("#515151")
xLine.addStyleElement(xLineStyle);
LUIFreeStackLayout.layout(xLine, {height:40})
this.gfx.gui.addChild(xLine);
xLine.setContainerLayout(LUILineLayout.createXAligned(40, 2))
{
const c = new LUIElement();
const s = new LUIStyleFill()
s.color.setFromHash("#ffcb4f")
c.addStyleElement(s);
xLine.addChild(c);
}
{
const c = new LUIElement();
const s = new LUIStyleFill()
s.color.setFromHash("#d595cf")
c.addStyleElement(s);
xLine.addChild(c);
}
{
const c = new LUIElement();
const s = new LUIStyleFill()
s.color.setFromHash("#8acf94")
c.addStyleElement(s);
xLine.addChild(c);
}
//
// vertical
const yLine = new LUIElement();
const yLineStyle = new LUIStyleFill();
yLineStyle.color.setFromHash("#515151")
yLine.addStyleElement(yLineStyle);
LUIFreeStackLayout.layout(yLine, {left: 5, width:40})
this.gfx.gui.addChild(yLine);
yLine.setContainerLayout(LUILineLayout.createYAligned(40, 2))
{
const c = new LUIElement();
const s = new LUIStyleFill()
s.color.setFromHash("#ffcb4f")
c.addStyleElement(s);
yLine.addChild(c);
}
{
const c = new LUIElement();
const s = new LUIStyleFill()
s.color.setFromHash("#d595cf")
c.addStyleElement(s);
yLine.addChild(c);
}
{
const c = new LUIElement();
const s = new LUIStyleFill()
s.color.setFromHash("#8acf94")
c.addStyleElement(s);
yLine.addChild(c);
}Custom Layouts
If LUILineLayout, LUISpaceLayout and LUIFreeStackLayout are not enough it's also possible to implement a custom layout.
To do that simply do this:
export class MyLayout implements LUIContainerLayouter {
    perform(parent:LUIElement):void {
        for (let i=0; i<parent.numChildren(); i++) {
            const child = parent.getChildAt(i);
            const someProp = child.getLayoutProperty("yourProp");

            // set based on parents position
            child.getPosition()
                .setX(parent.getX())
                .setY(parent.getX())
                .setWidth(parent.getWidth())
                .setHeight(parent.getHeight())

            // TODO: Implement a more interesting layout here!
        }
    }
}
For every child of the given parent you have to calculate the position based on the parent. It's possible to read properties from the children to finetune the children.